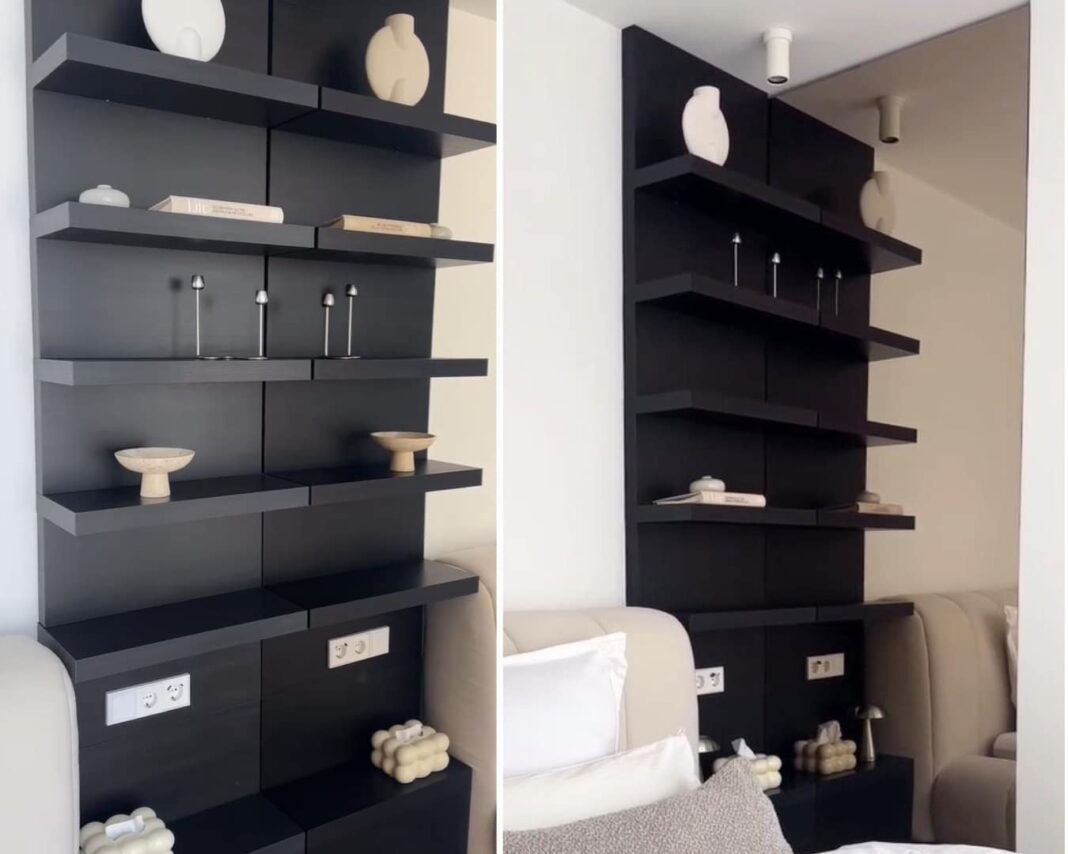
Let’s do a little IKEA math! What do you get when you multiply one IKEA shelf by 15 and add a mirror? Answer — a sleek shelf hack that looks twice as big as it is.
If you’re looking for a modern, streamlined display space that doesn’t take a lot of time, this DIY project from Anna @home.of.h fits the bill.
She used a bunch of PERSBY shelves to create a continuous wall shelf, very similar to the LACK wall shelf unit, but larger. (The closest thing to the PERSBY shelves at IKEA US is the LACK shelf.)
The really cool part is the bronze mirror on the adjacent wall that doubles the visual size of the shelves.
It’s a fantastic illusion, and tricks the eye into thinking there’s more space. It makes this hack twice the fun! Get it?
What You’ll Need
- 15 IKEA PERSBY (LACK) shelves (You may need more or less, depending on how high your ceilings are and what size you want for your display unit.)
- Appropriate mounting hardware for your wall
- Sockets and plates
- Mirror
- Basics — tape measure, pencil, screw gun, drill, saw
Create a Floor-to-Ceiling Wall Shelf Unit
1. Mount the Mirror
Hang the mirror (or have an installer do it) on the side wall in the corner where you plan to place the shelves. Anna had her mirror custom-made by Spiegel-Shop; it’s roughly 98 inches tall by 40 inches wide.
2. Build the Bottom
Use two of the shelves to create the bottom of the shelf unit. Position one perpendicular to the other, and connect the two. Slide into position against the wall where you want to start your shelving. Place it right against the mirror to get that nice, continuous illusion.
3. Set the Socket Shelves
Mark the position of the outlets on one of the shelves and create the cutout. Take your time with this step to ensure you get the placement just right and everything lines up properly. Position the shelf above the base and press into place.
You may or may not need to use more shelves here, depending on where the outlets are on the wall. Anna said her sockets were approximately 23 to 25 inches above the ground.
3. Work Your Way Up With the Shelves
Start putting shelves into place by mounting a shelf on the wall above the previous one, then positioning another flat against the wall between the two. Continue upward until you reach the ceiling, cutting down the final shelf if necessary to fit it snugly. Style your shelves, sit back, and admire your awesomeness.
There’s No One Way to Make This Hack
Take this idea and use it to inspire you to create the perfect wall shelf in your space. It doesn’t need to be precisely like Anna’s; after all, your home likely has different dimensions and spaces to fill. But this is certainly a great jumping-off point and shows that great-looking DIYs don’t have to be overly complicated.
You could even get simpler with this one by using the LACK wall units that are already built and mounting them next to a mirror.
Or if you prefer something larger, build your own using the longer LACK shelf. Need it smaller? Use the small LACK or cut one down to size to achieve a custom-fit shelf.
Plan Your Colors
People in the comments also had a lot to say, including the suggestion to use black sockets instead of white. Of course, you could also opt to use the white shelves instead of black, so again, it’s up to you.
That’s the beauty of DIYs; you get to put your own stamp on them, make tweaks, and recreate them to fit your unique needs and style.
If you’re looking for more LACK shelf hacks, there are all sorts of ways to shape and style this IKEA staple. For example, you could build a zig-zag bookcase or craft a wall of shoe storage.
Here’s Anna’s hack. Check it out, and be inspired to hack your own (and share it with us when you do.)
Don’t forget to follow Anna @home.of.h to check out more IKEA hacks, upgrades, and design ideas.

